.getClientRects()
クライアント内の各ボックスの短形の境界を含む短形のコレクションを返します。
文法
var rectCollection = object.getClientRects();
ClientRectオブジェクトのコレクションが返され、
それぞれが要素に関するCSSボーダーボックスです。
各ClientRectオブジェクトは、ボーダーボックスのピクセルを表す、
読み込み専用のleft、top、right、bottomプロパティを含みます。
また、top、leftはビューポートの左上からの相対になります。
キャプション(<caption>)を含むテーブル(<table>)では、
テーブルのボーダーボックスの外部であっても、キャプションは含まれることになります。
元々Microsoftには、このメソッドは各テキスト行のTextRectangleオブジェクトを返す、という意図がありました。
しかし、CSSDOMのワーキングドラフトでは、各ボーダーボックスでClientRectを返すことを指定しています。
インライン要素であれば、2つの定義は同じになりますが、
ブロック要素では、Mozillaは単一の矩形しか返しません。
Firefox 3.5では、TextRectangleオブジェクトへ、
widthとheigthプロパティを追加します。
外接する四角形を計算する際に、 ビューポート領域(または、その他のスクロール可能領域)で行われたスクロール量が考慮されます。
返される矩形は、オーバーフロー(overflow)が発生する可能性がある子要素の境界を含みません。
HTMLの自身が何かを描画するのでは無いAREA要素、SVG要素、
そして一般的に直接描画が行われない要素、display:noneの要素では、空のリストが返されます。
CSSボックスが空のボーダーボックスを持っていたとしても矩形は返され、
left、top、right、bottomの調節に意味があるとされます。
オフセットは、分数のピクセル値の可能性もあります。
例
下記の例は、スクリーンショットの画像になります。
下記はspanを内部に持つ段落(p)です。 spanとpはどちらもボーダーセットを持ちます。 赤線がクライアントの矩形になります。 spanが複数のボーダーボックスを持つのに対し、pは1つだけボーダーボックスを持つ事に注意してください。

下記はリストの例になります。 ボーダーボックスは数字を含まないため(訳注: ここではliの事のみを言及していると思われます)、クライアント矩形を行わないことに注意してください。 (Note that the border box doesn't include the number, so neither do the client rects.)
キャプション付きのテーブルです。 テーブルのボーダーボックスはキャプションを含みませんが、 クライアント矩形はキャプションを含みます。
function addClientRectsOverlay(elt) {
    // 絶対位置で各クライアント矩形にDIVを配置するため、
    // そのボーダー幅は矩形の幅と同じになります。
    // 注意:  ユーザーがリサイズやズームを行うと、
    //        オーバーレイの位置がずれてしまいます。
	var rects = elt.getClientRects();
	for (var i = 0; i != rects.length; i++) {
		var rect = rects[i];
		var tableRectDiv = document.createElement('div');
		tableRectDiv.style.position = 'absolute';
		tableRectDiv.style.border = '1px solid red';
		var scrollTop = document.documentElement.scrollTop || document.body.scrollTop;
		var scrollLeft = document.documentElement.scrollLeft || document.body.scrollLeft;
		tableRectDiv.style.margin = tableRectDiv.style.padding = '0';
		tableRectDiv.style.top = (rect.top + scrollTop) + 'px';
		tableRectDiv.style.left = (rect.left + scrollLeft) + 'px';

    // rect.widthをボーダー幅にしたいので、コンテンツ幅から2px減らします。
		tableRectDiv.style.width = (rect.width - 2) + 'px';
		tableRectDiv.style.height = (rect.height - 2) + 'px';
		document.body.appendChild(tableRectDiv);
	}
}
実稼働例
クライアント矩形を色付けするJavaScript関数は、 "withClientRectsOverlay"のCSSクラスを持つマークアップと連携している事に注意してください。
HTML
例1: HTMLは、内部にspanを持つ段落(p)が埋め込まれているdivブロックを、3つ作成します。
クライアント矩形は、2つ目の段落(p)と、3つ目のブロック内のspan要素に対して色付けされます。
<h3>A paragraph with a span inside</h3>
<p>Both the span and the paragraph have a border set. The client rects are in red. Note that the p has only one border box, while the span has multiple border boxes.</p>

<div>
 <strong>Original</strong>
 <p>
  <span>Paragraph that spans multiple lines</span>
 </p>
</div>

<div>
 <strong>p's rect</strong>
 <p class="withClientRectsOverlay">
  <span>Paragraph that spans multiple lines</span>
 </p>
</div>

<div>
 <strong>span's rect</strong>
 <p>
  <span class="withClientRectsOverlay">Paragraph that spans multiple lines</span>
 </p>
</div>
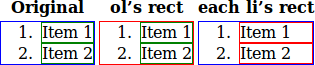
例2: HTMLは3つの順序付きリストを作成します。
クライアント矩形は、2つ目のolと、3つ目のブロックの各li要素を色付けします。
<h3>A list</h3>
<p>Note that the border box doesn't include the number, so neither do the client rects.</p>

<div>
 <strong>Original</strong>
 <ol>
  <li>Item 1</li>
  <li>Item 2</li>
 </ol>
</diV>

<div>
 <strong>ol's rect</strong>
 <ol class="withClientRectsOverlay">
  <li>Item 1</li>
  <li>Item 2</li>
 </ol>
</div>

<div>
 <strong>each li's rect</strong>
 <ol>
  <li class="withClientRectsOverlay">Item 1</li>
  <li class="withClientRectsOverlay">Item 2</li>
 </ol>
</div>
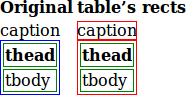
例3: HTMLはキャプション付きの2つのテーブルを作成します。 クライアント矩形は2つ目のブロックのテーブルを色付けします。
<h3>A table with a caption</h3>
<p>Although the table's border box doesn't include the caption, the client rects do include the caption.</p>

<div>
 <strong>Original</strong>
 <table>
  <caption>caption</caption>
  <thead>
    <tr><th>thead</th></tr>
  </thead>
  <tbody>
    <tr><td>tbody</td></tr>
  </tbody>
 </table>
</div>

<div>
 <strong>table's rect</strong>
 <table class="withClientRectsOverlay">
  <caption>caption</caption>
  <thead>
    <tr><th>thead</th></tr>
  </thead>
  <tbody>
    <tr><td>tbody</td></tr>
  </tbody>
 </table>
</div>
CSS
CSSは、1つ目の例では各divブロック内のpとspanの周りのボーダーに、
2つ目の例ではolとliの周りのボーダーに、
3つ目の例ではtable、tr、td要素の周りのボーダーに色付けを行います。
strong {
  text-align: center;
}
div {
  display: inline-block;
  width: 150px;
}
div p, ol, table {
  border: 1px solid blue;
}
span, li, th, td {
  border: 1px solid green;
}
JavaScript
JavaScriptのコードは、"withClientRectsOverlay"のCSSクラスが割り当てられた、 全てのHTML要素に対してClientRectsを色付けします。
function addClientRectsOverlay(elt) {
    // 絶対位置で各クライアント矩形にDIVを配置するため、
    // そのボーダー幅は矩形の幅と同じになります。
    // 注意:  ユーザーがリサイズやズームを行うと、
    //        オーバーレイの位置がずれてしまいます。
    var rects = elt.getClientRects();
    for (var i = 0; i != rects.length; i++) {
        var rect = rects[i];
        var tableRectDiv = document.createElement('div');
        tableRectDiv.style.position = 'absolute';
        tableRectDiv.style.border = '1px solid red';
        var scrollTop = document.documentElement.scrollTop || document.body.scrollTop;
        var scrollLeft = document.documentElement.scrollLeft || document.body.scrollLeft;
        tableRectDiv.style.margin = tableRectDiv.style.padding = '0';
        tableRectDiv.style.top = (rect.top + scrollTop) + 'px';
        tableRectDiv.style.left = (rect.left + scrollLeft) + 'px';

        // rect.widthをボーダー幅にしたいので、コンテンツ幅から2px減らします。
        tableRectDiv.style.width = (rect.width - 2) + 'px';
        tableRectDiv.style.height = (rect.height - 2) + 'px';
        document.body.appendChild(tableRectDiv);
    }
}

(function() {
  /* "withClientRectsOverlay"のCSSクラスが割り当てられている全てのHTML要素に対して、
      addClientRectsOverlay(elt)関数の呼び出します。  */
  var elt = document.getElementsByClassName('withClientRectsOverlay');
  for (var i = 0; i < elt.length; i++) {
    addClientRectsOverlay(elt[i]);
  }
})();
結果
仕様
CSSOM Views: The getClientRects() and getBoundingClientRect() methods
注意:
getClientRects()は、MSのIE DHTMLオブジェクトモデルに最初に導入されました。
関連項目
© 2017 Mozilla Contributors
Licensed under the Creative Commons Attribution-ShareAlike License v2.5 or later.
このページは、ページトップのURL先のMozilla Developer Network(以下、MDN)のコンテンツを翻訳した内容を基に構成されています。 構成について異なる点も含まれますので、下記の項目を確認し、必要に応じて元のコンテンツをご確認ください。 もし、誤訳などの間違いを見つけましたら、 @tomofまで教えていただければ幸いです。
- 特定のブラウザに特化しすぎている情報やあまりにも古い情報、 または試験的に導入されているようなAPIや機能については、省略していることがあります。
- 例やデモについて、実際にページ内で動作させる関係で一部ソースコードを変更している場合や、 その例で使用しているコンテンツの単語や文章などを日本人向けに変更しいてる場合があります。
- MDNの更新頻度が高いため、元のコンテンツと比べ情報が古くなっている可能性があります。
- "訳注:"などの断わりを入れた上で、日本人向けの情報の追記を行っている事があります。